Creating a mail server
Article published on :
Introduction
We will implement a full email service on Debian 9. This can be useful if you
want to control
the integrity of your data. In addition, it can also be useful when you have
HTML and PHP forms for
sending e-mails to your website.
Here I use a domain name purchased from OVH and a VPS from OVH as well. You can
It should be noted that it is quite
possible to use a domain name from OVH while using a VPS from another
supplier.
Technical needs:
- Own a domain name.
- Access to the DNS parameters of the domain.
- A server running Debian, here version 9.
- A fixed IP address from your ISP if you do it locally, if you use a VPS, you can forget this option.
- And have patience...
The parts:
- Installation of the necessary software
- Configuration and installation of Postfix and Postfixadmin
- Messaging authentication service
- Secure services
- Configuration of IMAP
- Configuration and installation of a webmail
- DNS registration
- Conclusion
- Sending the first mail on the command line.
- Sources
Installation of the necessary software
We will first update our system before we start all
manipulations on the latter. To do this we must enter the
next order :
apt-get update
Now that we have updated our system we will install the software
following:
- Mysql server software for mail and domain management.
- Postfix for the server mail software.
- Postfixadmin to manage domains and addresses with a graphical interface mails.
- OpenDkim for mail server authentication to other mail services.
- Mail in order to be able to use a webmail and a mail client such as Outlook.
- Apache2 to install a webmail on it.
- Rainloop as webmail. There is also another service called Roundcube.
First we will install the SQL server, Apache2. For that we will type the following command:
apt-get install mysql-server apache2 unzip mailutils
sudo apt-get install php5-curl
Configuration and installation of Postfix and Postfixadmin
Postfix
We will first install Postfix, for this you must noteapt-get
install postfix.
The installation of this software is quite simple. You must then obtain a
window identical to this one:
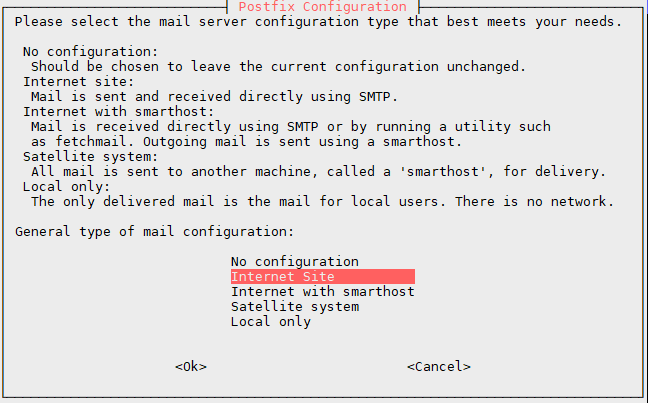
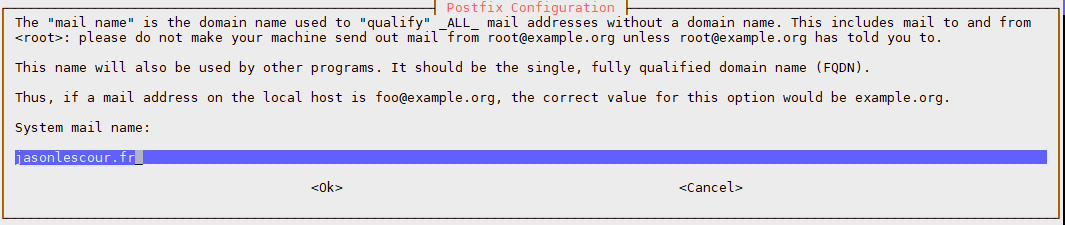
Here we will choose the default option, in other words, the option "Internet Site". This will allow us to configure a brand new mail server. Then, we must enter our domain name as illustrated. This will allow to define first The domain name that will be displayed after the @.
Now that we have just installed postfix, we need to configure it. All first, we will have to change the name of the server by renaming hostname, for that we will do
nano /etc/hostname
. We will also modify the file hosts
by replacing existing data. To do this we will do nano
/etc/hosts . Once we do that, we will need to
to restart our server or VPS. You can use the command reboot.
Postfix configuration
Now we can configure postfix. For that we will have to add a few lines in the file main.cf which is located in the postfix directory. So we're going to type :
nano /etc/postfix/main.cf
then add the following lines :
milter_default_action = accept

milter_protocol = 2

smtpd_milters = inet:localhost:12345

non_smtpd_milters = inet:localhost:12345
Postfixadmin
We will now install Postfixadmin, this software will allow us to manage our e-mail domains and e-mail addresses. To do this we will enter the following command :
- apt-get install postfixadmin
Thereafter we must accept of course as for the other installations,
all special requests for an installation
optimal.
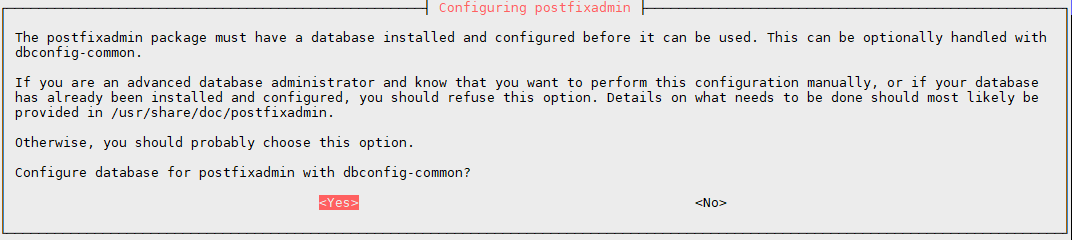 You do yes, then you continue the installation.
Once done, I invite you to go to the following address: "Your IP address for example 0.0.0.0/postfixadmin/setup.php"
You will therefore have to change your setup password, and replace the line $conf=['setup_password'] by the red field that appears as follows, in the file /etc/postfixadmin/config.inc.php. Find out more later, always in the web interface, an administrator email address and password.
 Once done, you must go to the following address to manage your domain and
your email addresses:
"Your IP address for example 0.0.0.0/postfixadmin/login.php". For you
connect, just fill in the fields and passwords you just entered
to define on the page setup.php of postfix.
Once done, you must go to the following address to manage your domain and
your email addresses:
"Your IP address for example 0.0.0.0/postfixadmin/login.php". For you
connect, just fill in the fields and passwords you just entered
to define on the page setup.php of postfix.
Message authentication service
What is the SPF, DKIM and DMARC service?
SPF
This technique makes it possible to authenticate the sender of an electronic message. For check the domain name it makes a request DNS type TXT to recognize the list of mail servers authorized to send e-mails with the domain name of the sender.
DKIM
DKIM is a reliable authentication standard for the sender's domain name. This
standard is effective in fighting spam and phishing.
This was developed using two technologies, one of which had been
developed by Yahoo and the other developed by Cisco.
Indeed, this standard works thanks to a cryptographic signature of the message. The
signature is used to verify the authenticity of the domain of
the sender and therefore guarantees the authenticity of the message. The verification of this
signature is done using a key located in the DNS zone
of the domain in question.
However, it should be noted that the SPF and DKIM protocol does not prevent the
receipt of e-mails. So that's why we have
enabled spam checking.
DMARC
DMARC is an email authentication protocol. This one is based on on the SPF and DKIM protocols of the mail server. Its mission is to process the sender's authentications, in other words, it is this protocol that validates the sending of messages. In case of failed authentication of the recipients a report is sent to the sender for authentication error. Its purpose is therefore to improve and monitor the protection of the domain in order to fight against Phishing.
Installation of an authentication service
We will install OpenDkim, this tool will allow us to realize a service
of authentication. In other words, it is thanks to the latter
that our server will be declared reliable. Indeed, this tool will make it possible to implement
sets a public key for DKIM.
To do this, we will first install OpenDkim using the following command
:
- apt-get install opendkim opendkim-tools
We will now configure OpenDkim. To do this we will move the
configuration file of the latter. To do this, we create
a folder opendkim at the root. Now we will proceed with the move
of the file and make a symbolic link between the two
file. Here are my orders :
mkdir /etc/opendkim/
mv /etc/opendkim.conf /etc/opendkim/
ln -s /etc/opendkim/opendkim.conf /etc/opendkim.conf
We also need to uncomment the port listening line in the file /etc/default/opendkim. This information has been compiled when configuring Postfix. Here is a screenshot of the configuration :

It is necessary to create the files TrustedHosts, SigningTable ainsqi and KeyTable, these files will be useful to us for configure the OpenDkim settings in the file opendkim.conf. To do this, we will we will enter the following commands :
touch /etc/opendkim/TrustedHosts
touch /etc/opendkim/SigningTable
touch /etc/opendkim/KeyTable
TrustedHosts
The file TrustedHosts is used to indicate the trust hosts. We need to so please enter our IP address, domain name, as well as localhost. We'll have to close this file by *.domain_name, this allows to allow all sub-domains of the FKDN to use this OpenDkim record. Here's how to do it:nano /etc/opendkim/TrustedHosts. The information to be entered is the
following, of course the comments
after # are not to be entered :
127.0.0.1 #adresse IP local.
localhost #nom local.
domaine.com #votre nom de domaine.
*.domaine.com #autorisation de tous les sous-domaines.
SigningTable
Configuration of the file SigningTable.This file is used to indicate to the server that all the server's e-mail addresses will belong to the domain we will define as the default domain. To configure it we type the command
nano
                                    /etc/opendkim/SigningTable
.
Here is the information I provide inside, of course the comments after # are not to be entered :
*@domain.com #the server hostname is entered here after @.
domain.com #on fills in the domain name that will be used as the domain for the e-mail addresses.
KeyTable
Configuration of the file KeyTable.This last file to configure, before going to the configuration of opendkim.conf, allows you to give a match between the selector, which is to be configured in the file opendkim.conf (we the will do later) and the private key of OpenDkim.
We will start by creating the key pair (private key and public key).
mkdir /etc/opendkim/keys
mkdir /etc/opendkim/keys/domaine.com
cd /etc/opendkim/keys/domaine.com
opendkim-genkey -s mail -d domaine.com
We will now check if it has been created by doing a simple ls. Then, we will use a command that is called chown to give all the rights to the software for the file we have previously created. We will therefore type the following command :
chown opendkim:opendkim mail.private
Now, we need to retrieve the key DKIM, in order to inform it to the DNS server during registration. We will finish the configuration of our service by DNS records. It is therefore advisable to copy the key to a safe place in the meantime. To retrieve this key, we will use the command
cat mail.txt.
The key to copy is located there :

Remember to remove the quotation marks, but also the brackets and the p=.
Now that we've finished this part, we just have to modify the file KeyTable.
To do this we will configure this file by typing the following command :
nano
                                    /etc/opendkim/KeyTable
.
Here is the information I provide inside, of course the comments after # are not to be entered:
*@domaine.com #on renseigne ici le hostname du serveur après le @.
domaine.com #on renseigne ici le nom de domaine qui servira de domaine pour les adresses e-mail.
Opendkim.conf
Now, we will move on to the complete configuration of OpenDkim by editing the file opendkim.com. To do this, we will we will type the following command
nano /etc/opendkim/opendkim.conf.
Here are the elements to be modified according to your email service and your domain name :
#, and enter your FKDN.
KeyFile = /etc/opendkim/keys/domain.com/mail.private #This line must be uncommented. This allows you to add and fill in your private key to the service.
Selector = mail #It is necessary to uncomment this line and we add as selector "mail".

SV mode #This line must be uncommented by removing #. This line is used to activate the e-mail signature and verification function.
Now that we've just done that, we need to fill in the files that we have edited before. For To this, the following lines should be added at the end of the document:
#Our keytable and SingningTable
KeyTable refile:etc/opendkim/KeyTable
SingningTable refile:/etc/opendkim/SingningTable

#Trusted Hosts
ExternalIgnoreList /etc/opendkim/TrustedHosts
InternalHosts /etc/opendkim/TrustedHosts

UserID opendkim:opendkim
Socket inet:12345@localhost
Secure the service created
In this part we will see how to secure email exchanges.
To this end, we will implement the TLS protocol to secure exchanges,
we will also put in a verification system
to avoid receiving spam. We will therefore set up filters for the
receipt of e-mails.
TLS protocol
We will therefore have to create a key pair to secure and encrypt our
exchanges.
This will make it possible to set up a certificate that will ensure the protection of the
mail server.
Let's get started! So we will create a directory that will contain our key pair,
then we
we will lead in the latter. To do this we will type the following commands:
mkdir /etc/postfix/ssl
cd /etc/postfix/ssl
We will now generate the keys that are necessary for our protection. For this we will execute the orders below. Now, it is important to inform the field that corresponds to the mail server for it to take effect. In other words, you must enter the Common Name the domain or subdomain to protect.
Here are the commands to be performed :
openssl req -nodes -newkey rsa:2048 -keyout /etc/postfix/ssl/postfix.key -out /etc/postfix/ssl/postfix.csr
openssl x509 -req -in /etc/postfix/ssl/postfix.csr -signkey /etc/postfix/ssl/postfix.key -out /etc/postfix/ssl/postfix.crt -days 999
Now we will associate what we just did with postfix. For this reason we will type the following command:
nano /etc/postfix/main.cf. We will also add the elements
at the end of the file. For this you can
can copy and paste and save the file.
# The TLS protocol
smtp_use_tls = yes
smtpd_use_tls = yes
smtp_tls_note_starttls_offer = yes
smtpd_tls_security_level = may
smtpd_tls_auth_only = no
smtpd_tls_loglevel = 6
smtpd_tls_received_header = yes
smtpd_tls_auth_only = yes
smtp_tls_note_starttls_offer = yes
tls_random_source = dev:/dev/urandom
smtpd_tls_session_cache_database = btree:${data_directory}/smtpd_scache
smtp_tls_session_cache_database = btree:${data_directory}/smtp_scache

# Le certificat et notre paire de clef
smtpd_enforce_tls = no
smtpd_tls_loglevel = 2
smtpd_use_tls = yes
smtpd_tls_key_file = /etc/postfix/ssl/postfix.key
smtpd_tls_cert_file = /etc/postfix/ssl/postfix.crt
Anti-Spam Filter
To implement a control of the e-mails received, we will perform checks more advanced. Indeed, with openDKIM, we let's check the authenticity of the server, but the content can still be content called "Unwanted". For that we will install some small tools.
Here is the command to use to install the software that will be needed to set up a spam filter.
apt-get install amavisd-new spamassin clamav clamav clamav-daemon arj zoo nomarch cpio lzop cabextract apt-listchanges libauthen-sasl-perl libdbi-perl libmail-dkim-perl p7zip rpm unrar-free libsn-perl libdbd-mysql-perl
We need to configure the link between postfix and these tools. For that we will add a few small lines in the file /etc/postfix/master.cf.
Here are the lines to add at the end of the file :
smtp-amavis unix -      -       n     -       2  smtp
-o smtp_data_done_timeout=1200
-o smtp_send_xforward_command=yes
-o disable_dns_lookups=yes
-o max_use=20

127.0.0.1:10025 inet n    -       n       -       -     smtpd
-o content_filter=
-o smtpd_delay_reject=no
-o smtpd_client_restrictions=permit_mynetworks,reject
-o smtpd_helo_restrictions=
-o smtpd_sender_restrictions=
-o smtpd_recipient_restrictions=permit_mynetworks,reject
-o smtpd_data_restrictions=reject_unauth_pipelining
-o smtpd_end_of_data_restrictions=
-o smtpd_restriction_classes=
-o mynetworks=127.0.0.0/8
-o smtpd_error_sleep_time=0
-o smtpd_soft_error_limit=1001
-o smtpd_hard_error_limit=1000
-o smtpd_client_connection_count_limit=0
-o smtpd_client_connection_rate_limit=0
-o receive_override_options=no_header_body_checks,no_unknown_recipient_checks
-o local_header_rewrite_clients=
Now let's go to the file /etc/postfix/main.cf, to add these two lines :
content_filter = smtp-amavis:[127.0.0.1]:10024
receive_override_options = no_address_mappings
It is also necessary to uncomment the lines in the grey part below in removing #.
- @bypass_virus_checks_maps = (
\%bypass_virus_checks, \@bypass_virus_checks_acl, \$bypass_virus_checks_re);

- @bypass_spam_checks_maps = (
\%bypass_spam_checks, \@bypass_spam_checks_acl, \$bypass_spam_checks_re);
We will also set up a quarantine to ensure that SPAMS are not the only ones appear in the the inbox. For this purpose we will create a directory for their reception.
mkdir /var/spool/virusmails
chown amavis:amavis /var/spool/virusmails
We need to check the rights of ClamAV and Amavis. To do this, we must have this line
AllowSupplementaryGroups true, in our file /etc/clamav/clamd.conf.
To avoid manually updating the spamassassin service, I type the command following
- sa-update -D. This will allow the latter to update itself to
automatically.
In addition, it is necessary to have
ENABLED=1 et CRON=1dans le fichier /etc/default/spamassassin.
There is only a small manipulation to do before finishing this configuration. We will add a user to a group called amavis. You just have to type this command
adduser
                                    clamav amavis
.
That's it, your mail server is now secure. However, it is necessary to restart the general services for that the changes take effect. To do this, simply execute the commands following :
service spamassassin start
service amavis restart
service clamav-daemon restart
service postfix restart
IMAP configuration
Configuration to come. This protocol will be used for the use of webmail as well as for email clients such as "Outlook, Gmail IMAP (on mobile phones),...".
Configuration and installation of a webmail
We will now install a webmail, so that we can easily read our
e-mails via a web browser.
Since this server only serves as a mail server only serves for mails, we
are going to head into the
directory /var/www/html (If you use it for other web services, you
will have to create a virtual host).
Then, we will perform the following command to delete the only document
existing: rm index.html.
Now we can install Rainloop, this software is our web system
mail, you can, if you wish
use RoundCube, another software also used as webmail.
To do this we will type the following command to install our webmail:
curl -s http://repository.rainloop.net/installer.php | php
Now, we will give the necessary rights to use this system, we so let's do the following operations:
chown -R www-data:www-data
find . type d -exec chmod 755 {} \;
find . type f -exec chmod 644 {} \;
We can now go to a browser to continue the configuration of our webmail. So we will go to this address "Your IP address for example 0.0.0.0.0.0/?admin".
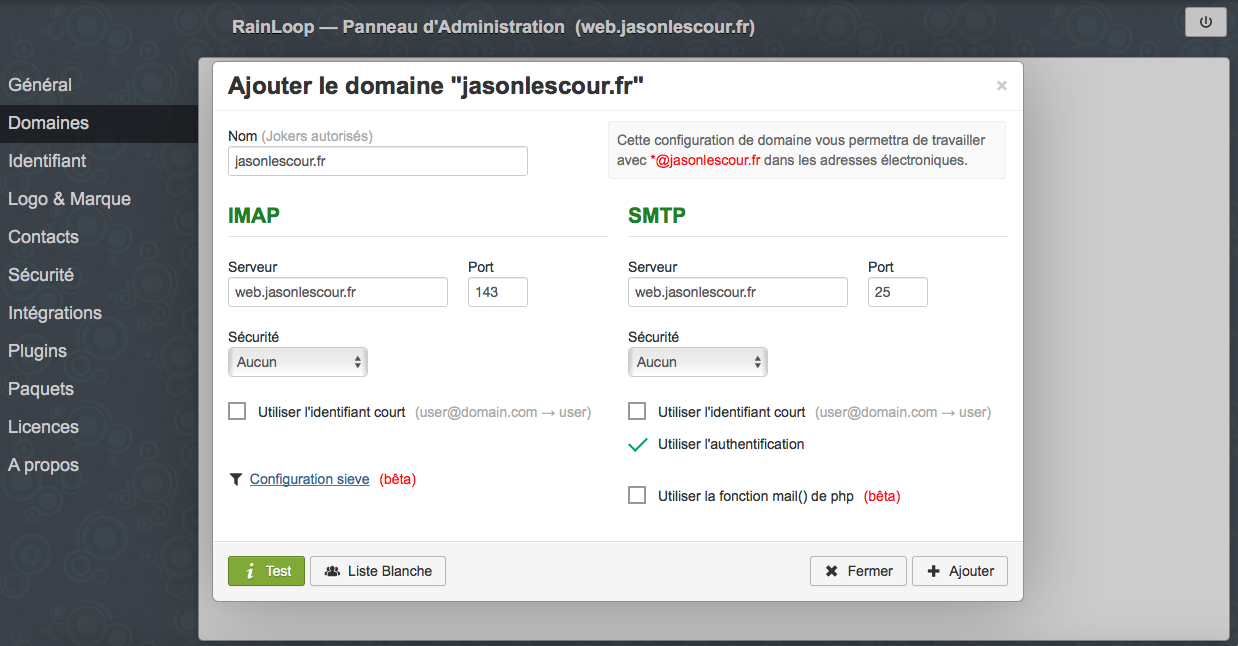
The default user is admin and the default password is 12345. Once logged in, you will be prompted to change the password. You can change it, then you will need to go to the domain area to enter your domain imap and SMTP. If they are green, that's it, you can access your personal space have the following link: "Your IP address for example 0.0.0.0.0.0/login".
Here is an example of a correct configuration:
Registration in the DNS zone
As a customer of OVH, the procedure that will follow is that of the OVH DNS servers, however it will work on the same principle with the others DNS providers. On the other hand, the graphical interface can be totally different.
 First we will add a redirection zone from a subdomain name to
our server, be careful, the FQDN name of the
mail server is the same for it to work properly. We will
add it with an IPv4 and IPv6 protocol. However, you can
using only IPv4 or IPv6, it depends on the type of address you have.
First we will add a redirection zone from a subdomain name to
our server, be careful, the FQDN name of the
mail server is the same for it to work properly. We will
add it with an IPv4 and IPv6 protocol. However, you can
using only IPv4 or IPv6, it depends on the type of address you have.
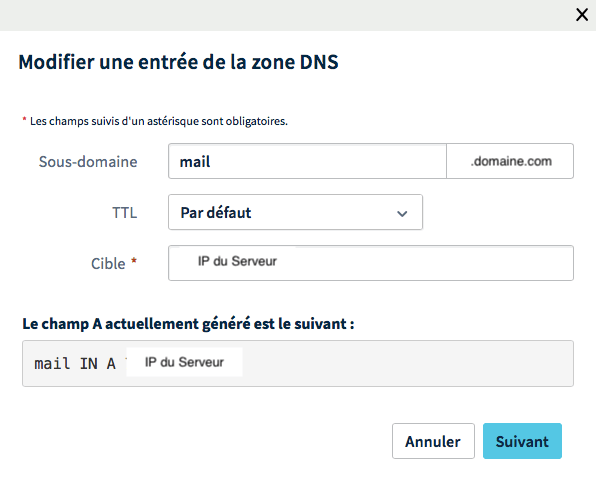
That is, the type A record corresponds to IPv4 and a
record type AAA corresponds to the address of IPv6 type.
We will now add an MX record, it is a part of the DNS (Domain Name System) which provides information about the mail server or mail servers that use your domain name.
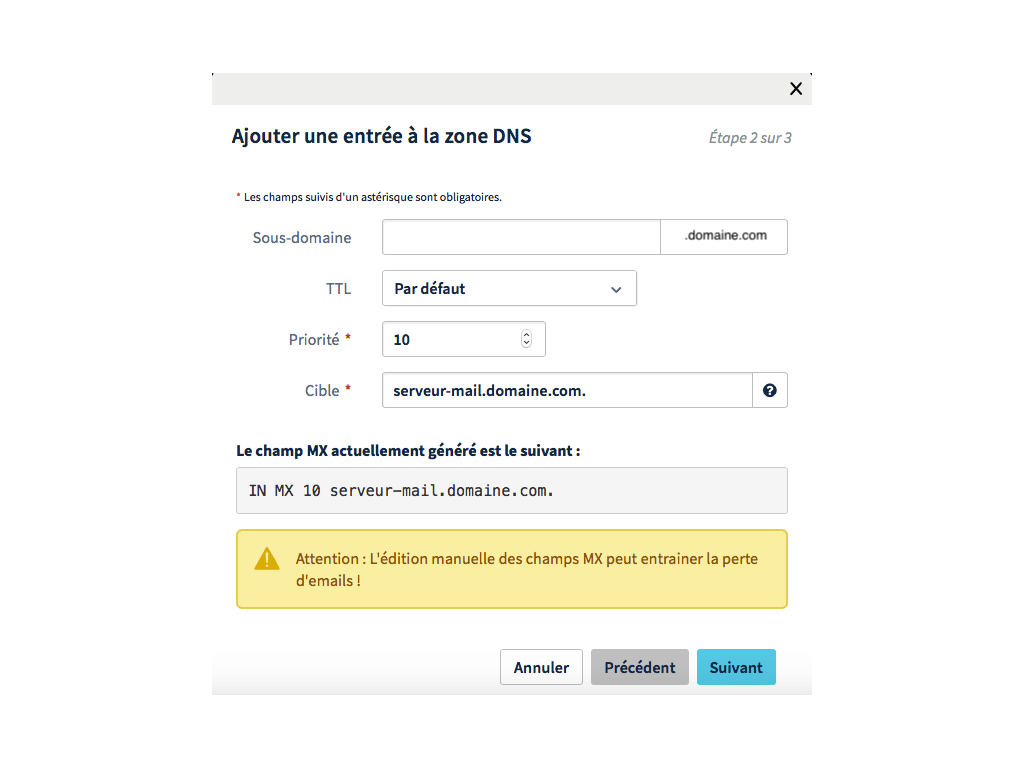
MX
MXRecord configuration We will leave the subdomain name empty to use the domain name main.We will add a priority of 10 since we only use one server, the priority allows you to define which is the main mail server.
The target allows you to target the domain name that targets your server.
DKIM configuration
In the DKIM registration you must register it as follows:- Subdomain : mailkey._domainkey.domain.com.
- Hash algorithm : you must check the SHA-1, SHA-256 algorithm.
- Key type : the RSA box must be ticked.
SPF configuration
For the SPF we will create a TXT record with our domain pointing to our mail server, or by adding a SPF record if your service allows it by filling in the MX field as well as the IP addresses of the server. Here is the text format of the recording :"v=spf1 a mx ip4:11.22.33.44 ~all"
DMARC configuration
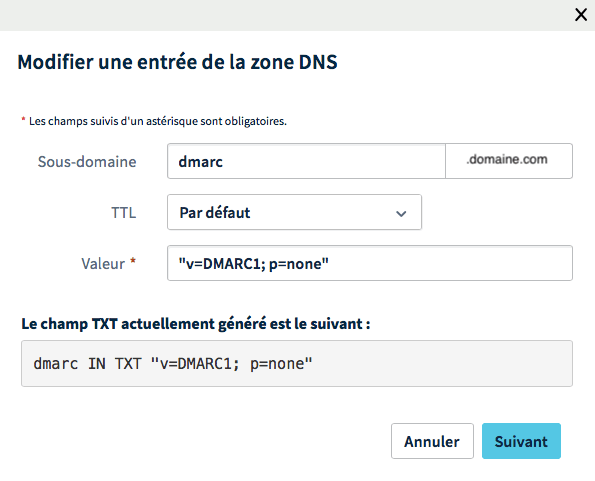
Now we will move on to DMARC registration. For this we will add a registration of the text type with the value "v=DMARC1; p=none". v allows you to define the version of DMARC used and p allows to give an order that must be given to the authentication of the server, here there will be no so no rejection.Conclusion
We have just configured an e-mail server. This one is now functional. From plus, the latter is accessible from Outside, with the settings we have configured. Our adjustments have therefore been made in so that the latter is considered as legitimate with other mail servers. This means that the messages sent via this server are well received to other reception boxes. In other words, the message is not going to be directed in the recipient's spam and will spend all the controls successfully. We have also just implemented a good base of security.
Command line mail server test
You can now send emails using the command prompt. This is feasible with mailutils that we had installed at the very beginning. Here is how to proceed (note that the # refers to the commentators who are there to guide you).
 mail adresse@destinataire.com #entered later and follow the instructions and fields.
# When you arrive at subject, you enter the subject of the mail, then you enter it. You can now write the message body.
# Sending mail
# To send your mail, you enter after your mail and then you make a ctrl D.
# Voilà, you have sent your first email from your mail server from the command line.
My different projects
Portfolio