Creating a NextCloud Personal Cloud Service
Article published on :
Introduction
We will implement a personal cloud service as does so well dropbox or
again
Google. For this we will use a Linux distribution, here Debian 9.
This will allow you to access your personal data, documents from anywhere.
texts, spreadsheets, etc.... We will therefore need a server equipped with
of the latest updates.
Here, we will implement this service with NextCloud, a Free Cloud software and
free of charge. It should be noted that there are other software programs such as OwnCloud,
Seafile, .... I realized this choice because this software offers us more
customization options and is freer than OwnCloud. However, it should be noted that this
software
is a derivative of OwnCloud and therefore allows a transition between OwnCloud and NextCloud, since
the
two databases are identical. This software is also updated more frequently
that
OwnCloud.
My choice was therefore based on these criteria.
The parts :
- Prerequisites
- Installing NextCloud
- NextCloud server configuration
- Adding functionality
- Conclusion
- Sources
Prerequisites
To install NextCloud on a Debian server, you must first have the following elements following:
- Apache2
- PHP 7
- Unzip
- MariaDB for a MySQL server
- A domain name
- A domain certificate such as lets encrypt
Installation
MySQL
To install NextCloud, you will need to create a database and an associated user. For to do this you can do this from the command line if you do not have PHP MyAdmin: Opening of the SHELL MySQL:Now you can type and execute MySQL queries. So we will create a base of data named NextCloud by doing this:mysql -u root -p
It is now necessary to create a user named NextCloud with the password Iroise29 :CREATE DATABASE NextCloud;
Now, let's add all the privileges for this user on this basis:>CREATE USER@ NextCloud'@'localhost' IDENTIFIED BY'Iroise29';
Validation of changes and return to the Linux command prompt:GRANT ALL PRIVILEGES ON NextCloud . TO'NextCloud' @'localhost';
>FLUSH PRIVILEGES;
exit;
Download NextCloud
We will now install the NextCloud software. For that we must go to in:Downloading the NextCloud archive:cd /var/www/html
We will now unzip the downloaded file:wget https://download.nextcloud.com/server/releases/nextcloud-14.0.1.zip
We will now give all write and read permissions to the NexCloud directory in order to that the software can work normally. To do this, we will you have to do this:unzip nextcloud-14.0.1.zip -d
chmod -R 700 nextcloud-14.0.1

sudo chown -R http
Creation of a VirtualHost Apache to access NextCloud from a browser
For that we will edit the file domain.com.conf, for that we will launch the next order :Now let's enter this ("#" Means it's a comment):nano /etc/apache2/sites-available/domain.com.conf
You can now leave this phase by saving the edited file. We restart Apache 2:
<VirtualHost *:80>


 ServerAdmin admin@domain.com # Administrator's email address

 DocumentRoot /var/www/html/nextcloud

 ServerName domain.com # Domain name belonging to us allowing us to access the service

 ServerAlias www.domain.com # Domain aliases


 Alias /nextcloud "/var/www/html/nextcloud/"


 <Directory /var/www/html/nextcloud>

 Options +FollowSymlinks

 AllowOverride All


 <IfModule mod_dav.c>

 Dav off

 </IfModule>


 SetEnv HOME /var/www/html/nextcloud

 SetEnv HTTP_HOME /var/www/html/nextcloud

 </Directory>


 ErrorLog /var/log/apache2/nextcloud-error_log

 CustomLog /var/log/apache2/nextcloud-access_log common


</VirtualHost>
Let's move on to the configuration.systemctl reload apache2
Configuration
To configure your cloud server, you must go to a browser and go to
the address you have previously defined. mydomain.com for example.
You should normally get a result such as the image on the right:
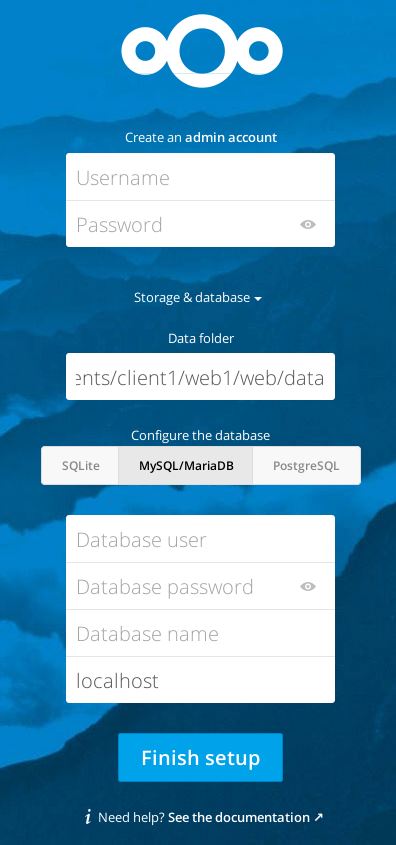
You will first need to enter a user name that will be part of the Administrator group.
Then you will choose a password associated with it.
We will also configure the path to the file directory. This one is
automatically filled in by default. You will therefore have the choice to modify it if you
want it. Be careful however, the web server must have all the rights
of
reading and writing on the mentioned directory. It is therefore the same with its
subfolders.
The part that will interest us to make our server useful is the configuration of the
database. Remember, we created an empty database with a user
partner. We will connect to it by filling out the form associated with the type MySQL/MariaDB.
You will therefore have to fill in the information in the following order:
- The username of the database, here I had chosen NextCloud.
- The associated password, I had taken Iroise29.
- The name of the database, here NextCloud.
- The IP address of the MySQL server, it can also be local. However, it is necessary to
specify
the port. Example:
localhost:3306 or 127.0.0.0.1:3306.
Then we have to connect and the server will automatically fill the database with tables and will update them with each use. That's it, we've finished the basic configuration of the server and you have a server operational.
Adding Features
To add features you have a market place within your server,
with
practically only open-source applications. So it's an advantage for our server.
You can add a WebMail, a calendar application, a
text
open-source as well. Nothing could be easier, go to the market place, then click on
add
the application or installed and then your service is already ready.
I let you discover all the applications.
Conclusion
You therefore have a cloud web application accessible from a connection
internet
via a browser or an application.
To connect via an application you can find them on platforms such as Google
Play and the App Store under IOS.
There are also applications from other platforms such as MacOS,
Windows
or Linux.
The advantage of this service is that it is free of rights and we have the possibility to
improve it and put it in our image since the
source codes are available on Github.
Sources
My different projects
Portfolio